1.1. Home Screen & Ribbon

THE HOME SCREEN


Welcome to Revit! The latest version includes a new home screen where you can visualize your most recent projects.
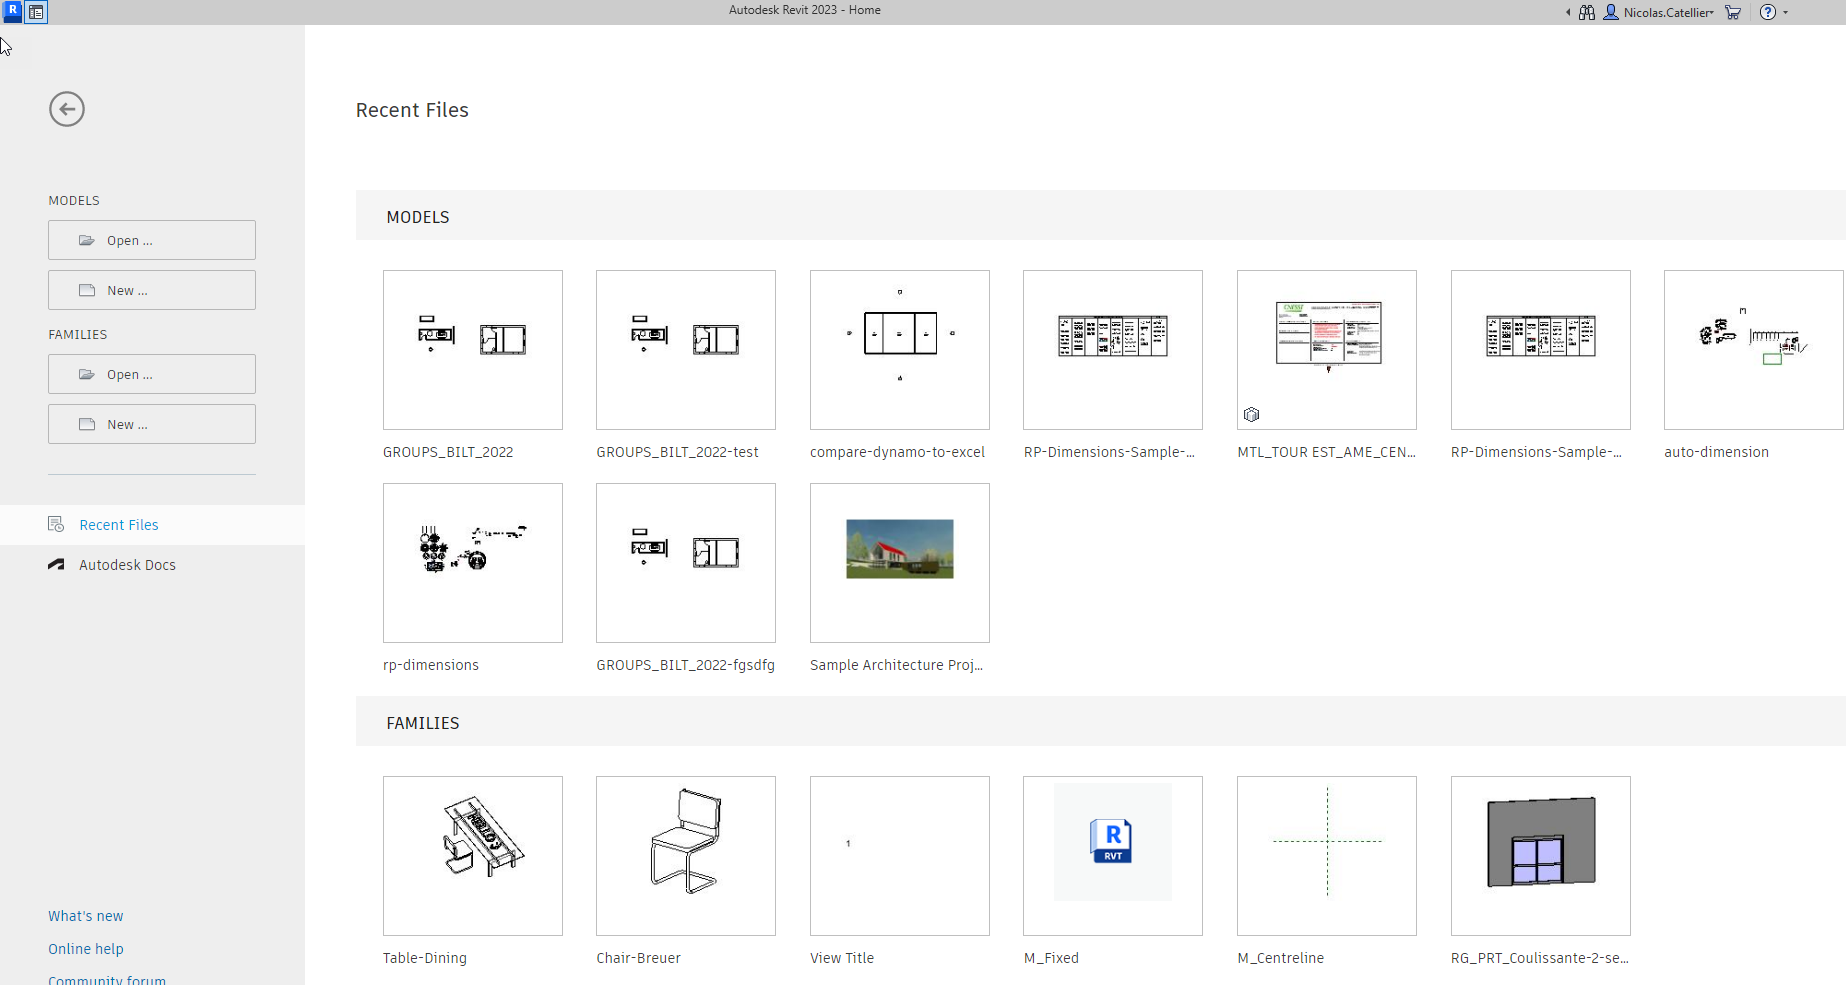


Notice that at the top left of your screen, there are two small icons. Click on the “Home” icon to switch between the Home screen and the active Revit project.


THE RIBBON



The ribbon is located at the top of your screen. It contains almost all tools used in Revit. It is divided by tabs, which are described below.


FILE TAB: CREATE, OPEN, SAVE, EXPORT, PRINT

Use this tab to create new models or families. You will also find the open, save, export and print tools.


ARCHITECTURE TAB: MODEL EVERYTHING

Every architecture element that appears in 3D in your model is created from this tab.


STRUCTURE TAB: CREATE BEAMS AND COLUMNS

This tab is made to be used by structural engineers. If you are an architect or designer, it is used for beams, columns and foundations.


INSERT TAB: LOAD FILES TO YOUR PROJECT

Any external files coming to your model are inserted from this tab. For example, images, CAD, linked Revit and families.


ANNOTATE TAB: ADD 2D ELEMENTS TO YOUR VIEWS

Every tag, dimension, detailing lines, text symbol and revision cloud come from here. They are added to a single view and are not part of the 3D model.


ANALYZE TAB: SIMULATE AND OPTIMIZE YOUR MODEL

This tab is mostly used by engineers for pipe and duct calculations. For architects, it contains the “Path of Travel” feature, which can be helpful to verify code requirements.


MASSING & SITE TAB: CREATE THE SURROUNDINGS

This tab is for landscape. Create topography, trees, parking and other fun components around your building. It also contains the Conceptual Mass that is used to create weird 3D volumes.


COLLABORATE TAB: WORK WITH OTHER PEOPLE

If you are working with a team or with consultants, this is the tab you are looking for. You will find the synchronize and reload tools, as well as Worksets. All these fancy words might confuse you: no worries, we will cover it all.


VIEW: PUT YOUR MODEL ON PAPER

Ceiling plan, 3D views, wall sections, door schedules, legends, name it! It is created from here. You also control the sheets and title blocks.


MANAGE TAB: SETTINGS FOR YOUR MODEL

This tab is mainly for BIM managers and advanced users. It contains settings like lineweights, parameters, phases and design options.


ADD-INS: EXTERNAL FEATURES

This tab contains a few additional Autodesk features and most external add-ins by 3rd party developers. In addition, the Worksharing Monitor and eTransmit features included here are helpful.

[PLUGIN NAME] TAB: Some custom plugins will have their own custom tab in your ribbon.


MODIFY TAB: ADJUST ELEMENTS

Make changes to elements that are already created in your model. This tab is where you will find basic commands like move, copy, and mirror. The content of this tab is different depending on which element you select.

BASICS

Buy nowLearn more

Introduction

  • Watch this video first!4

Downloads

  • Revit Pure BASICS Template Bundle (2017-2023 versions)
  • BASICS Template 2023 Metric
  • BASICS Template 2023 Imperial
  • BASICS Template PDF Guide
  • BASICS eBook PDF
  • Pamphlets Collection
  • Revit 2024 New Features Special Pamphlet

Chapter 1 - User Interface

  • 1.1. Home Screen & Ribbon4
  • 1.2. Status, View and Options Bars
  • 1.3. Project Browser and Properties
  • 1.4. 11 Tips to Understand Revit's User Interface2
  • 1.5. Category, Family, Type and Instance
  • 1.6. New User Interface Features in Revit 2024

Chapter 2 - Select

  • 2.1. Selecting Elements

Chapter 3 - Modify

  • 3.1. Adjusting Existing Elements
  • 3.2. Using Snaps
  • 3.3. Lock and Constrain Elements

Chapter 4 - Walls

  • 4.1. 3 Steps to Create a Basic Wall4
  • 4.2. Adjust Walls and Create Sweeps2
  • 4.3. Modify Wall Structure
  • 4.4. 5 Basic Walls Tips
  • 4.5. 4 Advanced Walls Tips

Chapter 5 - Levels and Grids

  • 5.1. Create Levels & Grids3
  • 5.2. 5 Basic Levels and Grids Tips3
  • 5.3. Advanced Tip: Using Scope Boxes

Chapter 6 - Floors

  • 6.1. Create a Floor
  • 6.2. 4 Floors Tips

Chapter 7 - Ceilings

  • 7.1. Create a Ceiling

Chapter 8 - Roofs

  • 8.1. Create a Roof
  • 8.2. 10 Roof Tips
  • 8.3. 5 Advanced Roof Tips

Chapter 9 - Doors

  • 9.1. Create a Door

Chapter 10 - Windows

  • 10.1. Create a Window

Chapter 11 - Curtain Walls

  • 11.1. What Are Curtain Walls?
  • 11.2. Create a Curtain Wall
  • 11.3. 11 Curtain Walls Tips
  • 11.4. 3 Advanced Curtain Walls Tips

Chapter 12 - Stairs

  • 12.1. Understand and Create Stairs
  • 12.2. 9 Essential Stairs Tips
  • 12.3. 3 Advanced Stairs Tips2

Chapter 13 - Railings

  • 13.1. Create a Railing
  • 13.2. 5 Railings Creating Tips
  • 13.3. The Anatomy of a Railing
  • 13.4. Create a Railing Type
  • 13.5. 5 Tips to Create the Perfect Railing Type
  • 13.6. 4 Advanced Railing Tips

Chapter 14 - Columns

  • 14.1. Structural vs Architectural Columns
  • 14.2. Insert and Create Structural Columns
  • 14.3. Create a Dark Solid Fill for Columns

Chapter 15 - Components

  • 15.1. Placing a Component
  • 15.2. Different Kind of Components

Chapter 16 - Site

  • 16.1. Create a Toposurface
  • 16.2. Use Floors for Simple Sites
  • 16.3 New Toposolid Tool in Revit 2024

Chapter 17 - Materials

  • 17.1. Create a Material
  • 17.2. Split Face / Paint

Chapter 18 - Rooms

  • 18.1. Create Rooms

Chapter 19 - Views

  • 19.1. How to Create New Views
  • 19.2. 5 Settings to Adjust in Each View
  • 19.3. Setting Far Clip
  • 19.4. New in Revit 2024: Textures Visual Style

Chapter 20 - Plan Views

  • 20.1. Create Plan Views & View Range
  • 20.2. Advanced View Range Tips

Chapter 21 - Sections

  • 21.1. Create a Section

Chapter 22 - Elevations

  • 22.1. Create an Elevation

Chapter 23 - Callouts

  • 23.1. Create a Callout

Chapter 24 - Details

  • 24.1. Create Detailing
  • 24.2. 8 Tips for Efficient Detailing

Chapter 25 - 3D Views

  • 25.1. Create 3D Views
  • 25.2. Create a Perspective

Chapter 26 - Legends

  • 26.1. What are Legends Used for?1

Chapter 27 - Visibility

  • 27.1. Hide Elements
  • 27.2. Visibility Graphics + Isolate
  • 27.3. Advanced Tip: Using Filters

Chapter 28 - View Templates

  • 28.1. Create a View Template

Chapter 29 - Lines

  • 29.1. Detail Lines vs Model Lines
  • 29.2. Create a Line Style

Chapter 30 - Tags

  • 30.1. What is a Tag?
  • 30.2. 6 Basic Tags Tips

Chapter 31 - Text

  • 31.1. Place Text and Adjust Leaders

Chapter 32 - Regions

  • 32.1. What is a Region?
  • 32.2. Edit a Region Type
  • 32.3. Create a Pattern

Chapter 33 - Dimensions

  • 33.1. Create a Dimension

Chapter 34 - Sheets

  • 34.1. Using Sheets
  • 34.2. 3 Tips to Navigate Sheets
  • 34.3. Advanced Tip: Modify a Title Block

Chapter 35 - Revisions

  • 35.1. Create and Set Revisions
  • 35.2. New in Revit 2024: Set Revisions to Multiple Sheets

Chapter 36 - Print

  • 36.1. Print your Sheet or View
  • 36.2. Export to PDF

Chapter 37 - Central Files

  • 37.1. Central and Local Files
  • 37.2. 8 Steps to Create a Revit Cloud Model

Chapter 38 - Link Files

  • 38.1. Preparing and Linking CAD Files
  • 38.2. 4 Linked CAD Tips
  • 38.3. Link PDF and Images

Chapter 39 - Export CAD

  • 39.1. How to Export to DWG
  • 39.2. Use DiRoots ProSheets Plugin

Chapter 40 - Schedules

  • 40.1. What are Schedules Used for?
  • 40.2. 23 Tips to Become a Schedule Master2

Chapter 41 - Phases

  • 41.1. Create and Set Phases
  • 41.2. Using Phases Graphic Overrides

Chapter 42 - Worksets

  • 42.1. Create Worksets
  • 42.2. 5 Tips to Use Worksets Properly

Chapter 43 - Groups

  • 43.1. Create and Adjust Groups

Chapter 44 - Model In-Place

  • 44.1. What is Model In-Place

Chapter 45 - Families

  • 45.1. Understanding Families in Revit
  • 45.2. Create a Cabinet Family
  • 45.3. Create an Annotation Family

Chapter 46 - Design Options

  • 46.1. Create Design Options

Exercice Projet - Secret Lab

  • Secret Lab Instructions - Metric
  • Secret Lab Instructions - Imperial
  • Secret Lab - Video Tutorial Solution - Part 1
  • Secret Lab - Video Tutorial Solution - Part 2